
Today, we’re delving into a valuable feature within Remark Office OMR that can help optimize your workflow. When reading images with the Package and Rename feature in Remark Office OMR you can add a field called [Image Name] that allows you to use the original file name in the new name of the packaged image.
To use this feature have your template opened in the data center and select Read from the Data tab.
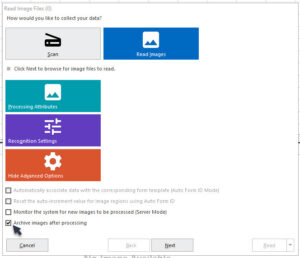
Select Show Advanced Options.
Check the box next to Archive images after processing. Then, click the Next button.
Select the image files that you want to process.
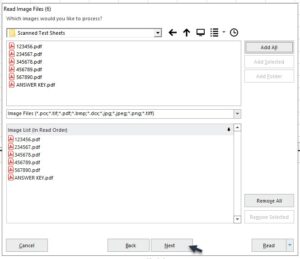
Click the Next button.
In the “How would you like us to handle your image archiving?” window, click the Name Builder button.
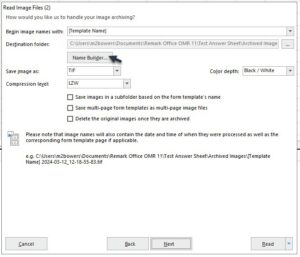
This will open the Image Name Builder window. The images will be placed in the Destination Folder. If you want the images to placed in a different location click the ellipse (…) and browse to the location.
Click on the drop-down menu for Image Base Name, select [Image Name]. Then, click + Insert Data into Base Name to add the Image Name to the Image Base Name.
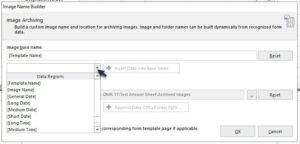
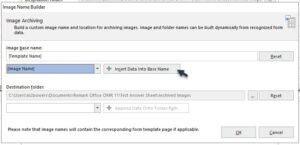
The Image base name box will show the [Template Name] and [Image Name].
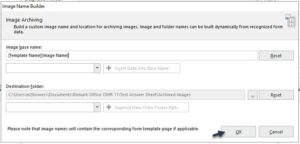
Click the OK button. Then, click the Read button to read your selected scanned image files.
Your scanned image file name is now added to the archived image file name.
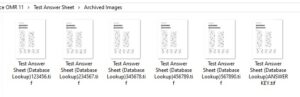
And there you have it! By using the [Image Name] field in Remark Office OMR’s Package and Rename feature, you can seamlessly integrate original file names into your archived image names. This simple but effective technique enhances the organization of your scanned documents. Try it out and see how it helps your workflow! Happy scanning!
Remark Product Support can be reached Monday – Friday (except for major holidays) from 9 am – 6 pm Eastern Time at 610-647-8595 or by email at [email protected].
Share This
What Now?